A rustic backyard isn’t about perfection, it’s about creating a space that feels lived-in, welcoming, and authentically yours. Whether you’re drawn to the charm of reclaimed wood, the warmth of a fire pit, or the simplicity of natural materials, rustic design celebrates imperfection and function. The good news? You don’t need a contractor or a massive budget to build one. With some basic tools, salvaged materials, and elbow grease, you can transform your outdoor space into a retreat that feels like a cozy escape. These seven DIY rustic backyard ideas are designed to be achievable for homeowners and enthusiasts willing to get their hands dirty, and have fun doing it.
Table of Contents
ToggleKey Takeaways
- Build a DIY rustic backyard with achievable projects like fire pits and reclaimed wood planters that don’t require contractors or massive budgets.
- A rustic fire pit serves as the entertaining heart of your backyard—position it at least 10 feet from structures and always check local fire codes before building.
- Create weathered wood planter boxes from reclaimed lumber and stack them at different heights for visual interest and layered rustic aesthetic appeal.
- Install a rustic pergola with natural wood finishes and exposed joinery to provide shade, structure, and support for climbing vines.
- Design comfortable seating from salvaged materials like barn wood and cast-iron brackets, then layer with weatherproof cushions and blankets for authentic rustic charm.
- Define your space with natural pathways using gravel or stepping stones, combined with vintage-inspired lighting to transform your backyard into an inviting evening retreat.
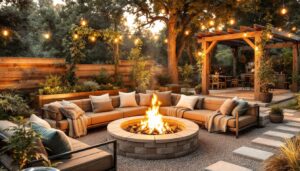
Build A Rustic Fire Pit Area
A fire pit is the heart of any rustic backyard retreat. Beyond the ambiance, it creates a gathering space for friends and family, and it’s simpler to build than most assume.
Materials and Tools:
• Concrete blocks or stacked stone (roughly 12–18 blocks depending on pit size)
• Shovel and level
• Landscape fabric (optional, for drainage)
• Gravel or pea stone
• Heavy-duty work gloves and safety glasses
Basic Steps:
- Choose a location at least 10 feet away from your home, trees, and fences. Check local fire codes, many jurisdictions require permits or have specific setback rules.
- Excavate a shallow pit (4–6 inches deep) and level the base.
- Lay landscape fabric and cover with gravel for drainage.
- Stack your concrete blocks or stones in a circle, leaving gaps between blocks for airflow. A 3-foot diameter is ideal for heat distribution without being oversized.
- Secure the top ring with construction adhesive if using concrete blocks.
- Add a grate (salvaged or new) across the top to contain logs.
Safety and Compliance:
Check your municipal fire code before building, some areas require a brick or metal ring insert, clearance from structures, or a permit. Keep a garden hose or fire extinguisher nearby. Never leave a fire unattended, and fully extinguish coals with water before leaving.
A fire pit transforms your backyard into an entertaining hub, especially when combined with the right seating setup and thoughtful planning for your outdoor space.
Create Weathered Wood Planter Boxes
Rustic planter boxes made from reclaimed or weathered wood add instant character while serving a functional purpose. The aging process is where the magic happens, weathered wood has a story, and you can create that patina yourself or source authentic salvage.
Materials:
• 2×10 or 2×12 reclaimed lumber (actual dimensions roughly 1.5″ × 9.25″ or 11.25″)
• Galvanized or exterior-grade screws (2.5 inches long)
• Wood stain or exterior sealer (optional)
• Landscape fabric and soil
Tools:
• Power drill with screwdriver bit
• Circular saw or miter saw
• Measuring tape and square
• Work gloves
Assembly:
- Cut four boards to length (a 24-inch box is standard) and four for the sides.
- Assemble a rectangular box by drilling pilot holes and driving 3 screws per corner to avoid splitting.
- For weathering, leave raw wood exposed to sun and rain for several months, or apply a diluted stain to accelerate the look.
- Line the interior with landscape fabric to prevent soil from washing out, then fill with quality potting mix.
Pro Tip:
Larger boxes are easier to maintain than small ones, they hold more moisture and soil volume. Stack multiple boxes at different heights for visual interest. If your wood shows rot or soft spots, replace those boards: structural integrity matters.
These planters look stunning clustered near a seating area or alongside pathways, adding layers to your rustic aesthetic.
Install A Rustic Pergola Or Arbor
A pergola or arbor provides shade, structure, and a vertical focal point, perfect for vining plants like clematis, grapevines, or hops. A rustic design embraces exposed joinery and natural wood finishes rather than sleek, painted structures.
Materials (Basic 8×8 ft Pergola):
• 4×4 posts (cut to height, typically 8–10 feet tall for a 7–8 ft clearance)
• 2×6 or 2×8 beams and joists for the frame
• Exterior screws and lag bolts (½-inch diameter, 4 inches long)
• Concrete for post footings (if ground-mounted)
• Galvanized brackets (optional, for additional support)
Key Build Steps:
- Set posts in concrete footings, ensuring they’re plumb and braced during concrete cure (24–48 hours).
- Attach primary beams (2×8) to posts using lag bolts or bolted brackets: these carry the load.
- Space secondary joists (2×6) 12–16 inches on center for even shade and vine support.
- Angle the joists slightly or space them for lattice effect, rustic doesn’t mean random.
- Optional: Add cross bracing or diagonal supports if pergola exceeds 10 feet or is in a high-wind area.
Considerations:
This is a structural project: if your pergola is over 6 feet tall or will support significant snow load, consult local building codes. Many jurisdictions require permits for permanent structures. Consider hiring help, setting posts accurately requires precision and often benefits from an extra pair of hands.
Pergolas take time to look “established,” but once vines mature, they become the showpiece of a rustic backyard.
Design A Cozy Seating Area With Reclaimed Materials
Comfortable, weather-resistant seating is essential to a functional rustic retreat. Using reclaimed or salvaged materials, barn wood benches, vintage metal frames, or repurposed pallets, reinforces the aesthetic without very costly.
DIY Bench From Reclaimed Wood:
- Source a solid 4×10 or 4×12 beam for the seat (rough-hewn is ideal).
- Build sturdy legs from 4×4 posts or salvaged iron brackets, ensuring the bench sits 18 inches high.
- Attach the seat using lag bolts or bolted brackets: avoid screws alone for weight-bearing surfaces.
- For a backrest, add a 2×8 or 2×10 board at a slight recline.
- Sand lightly to remove splinters, but leave the patina intact.
Cushions and Styling:
Weatherproof cushions in muted tones (sage, taupe, charcoal) soften the hardness of wood and metal while staying rustic. Layer with chunky throw pillows and wool blankets for warmth and texture.
Materials to Scavenge:
• Barn wood, railroad ties, or old fence boards
• Cast-iron brackets or antique metal frames
• Reclaimed bricks for slab-style seating
Safety Note:
Reclaimed wood may contain nails, rot, or splinters. Inspect thoroughly, remove fasteners, and sand any rough edges. Test for stability before sitting: a bench that fails mid-use is both embarrassing and dangerous.
A well-designed seating area becomes the social hub of your rustic backyard, perfect for conversations and quiet evenings.
Add Rustic Lighting With Vintage Touches
Lighting transforms a rustic retreat from day space to evening sanctuary. Vintage-inspired fixtures, lanterns, Edison bulbs, and salvaged sconces, cast a warm, intimate glow without looking overdone.
Hardwired vs. Portable Options:
String lights and lanterns are the easiest DIY approach. Hang commercial-grade outdoor string lights (rated for wet conditions) from your pergola, posts, or between trees using galvanized eye bolts and cable. Space fixtures every 8–10 feet for even illumination. Edison-style bulbs in warm color temperature (2700K) evoke vintage charm without looking theatrical.
Solar-Powered Alternatives:
If running electrical is complicated, solar stake lights and lanterns provide ambiance without wiring. Expect lower brightness than hardwired options, but they’re maintenance-free and require no permits.
DIY Lantern Holders:
Salvaged metal cages, old Mason jars mounted in rustic holders, or hand-forged iron sconces can be sourced affordably online or at salvage yards. Pair with candles or battery-operated lights for a layered, cozy effect.
Electrical Safety:
If running hardwired fixtures, use outdoor-rated wiring and weatherproof boxes. Hire a licensed electrician if you’re unsure, improper wiring can cause shock, fire, or code violations. All outdoor outlets should be GFCI-protected (ground-fault circuit interrupter).
Proper lighting elevates a simple seating area into an enchanting evening destination.
Layer In Natural Pathways And Gravel
A rustic backyard needs intentional flow. Pathways, whether gravel, stepping stone, or decomposed granite, guide visitors through the space and define different zones.
Simple Gravel Path:
- Mark your path width (2–3 feet is walkable).
- Remove grass and weeds using a spade: rake level.
- Optional: Lay landscape fabric to suppress weeds and prevent gravel from sinking into soil.
- Spread pea gravel or crushed granite 2–3 inches deep. Both are rustic-looking and drain well.
- Tamp gently with a hand tamper or rake.
- Top-dress annually as gravel settles.
Stepping Stone Paths:
For a more polished look, set 12×12-inch flagstone or slate pieces 6–12 inches apart on a bed of sand. This works especially well near seating areas or connecting structures.
Edging:
Rustic edging keeps gravel contained and defines the path. Use galvanized steel edging, reclaimed wood boards, or natural stone set partially into the ground. This prevents spreading and adds visual structure.
Gravel Maintenance:
Rake paths monthly to level high spots and keep them tidy. Top-dress with fresh gravel each spring. Weeds can still push through, so spot-treat or pull them as they appear.
Well-maintained pathways transform a scattered backyard into a cohesive, inviting space. They also improve drainage and prevent trampled grass in high-traffic areas.
Consider pairing natural pathways with creative backyard ideas that incorporate plantings and focal points along the route. Also, if you’re planning entertainment-focused gatherings, explore how backyard entertaining strategies can leverage your newly created pathways for seamless guest flow.
Conclusion
Building a rustic backyard retreat is less about following rules and more about embracing natural materials, honest construction, and spaces that invite you to linger. Start with one or two projects, a fire pit and seating, or a pergola and pathways, and expand as your vision and comfort level grow. Don’t rush the weathering process: the character of rustic design deepens with time. With these seven ideas and a willingness to get your hands dirty, you’ll create an outdoor space that feels both timeless and uniquely yours. Your backyard isn’t just an afterthought anymore, it’s a retreat.