Growing your own vegetables, herbs, and flowers doesn’t require acres of land. A small backyard greenhouse is one of the smartest moves for anyone serious about year-round gardening, and the good news is you don’t need a fortune to get started. Whether you’re working with a postage-stamp-sized yard or tucked between a fence and a shed, there’s a greenhouse solution that fits. This guide walks you through practical small backyard greenhouse ideas, from budget-friendly cold frames to vertical designs that maximize every inch. You’ll find real-world options that work with your space, skill level, and timeline.
Table of Contents
ToggleKey Takeaways
- Cold frames and mini greenhouses are budget-friendly entry points for small backyard greenhouse ideas, costing $50–$300 and extending growing seasons by 4–6 weeks without electricity or complex installation.
- Vertical designs like lean-to structures and wall-mounted systems maximize growing capacity in compact yards by tripling or quadrupling output in the same footprint through tiered shelving and trellises.
- Proper placement facing south with 6+ hours of direct sunlight, combined with adequate air circulation and humidity control (50–70%), prevents disease and ensures healthy plant growth year-round.
- Year-round production requires strategic crop selection—cold-hardy greens for winter, heat-lovers for spring/summer—paired with passive solar gain, thermal mass (water barrels or bottles), and supplemental LED grow lights on cloudy days.
- DIY repurposed materials like salvaged windows, food-grade pallets, and plastic bottles create low-cost greenhouse solutions while reducing waste and providing the same functionality as commercial kits.
- Weekly pest scouting, early-day watering to prevent fungal issues, and proper ventilation are essential maintenance practices that protect your small greenhouse investment and maximize productivity.
Cold Frames and Mini Greenhouses: Budget-Friendly Starter Options
If you’re dipping your toes into greenhouse gardening, a cold frame is your entry point. These simple boxes with hinged lids (or sliding tops) rely on passive solar heat and aren’t fancy, but they work. A basic cold frame measures about 2 feet deep by 3 feet wide and 12–18 inches tall, giving you plenty of growing room without very costly.
You can build one from scrap wood and reclaimed window sashes (the glass panels from old windows), or buy a kit for $100–$300. The beauty is simplicity: no electricity, no ventilation fans, just the sun doing the heavy lifting. Cold frames extend spring and fall growing seasons by 4–6 weeks and protect seedlings from frost, wind, and hungry critters.
Mini greenhouses, those small A-frame or dome structures made from PVC and plastic sheeting, run $50–$200 and take an hour to assemble. They’re lightweight, portable, and perfect for renters or anyone testing the waters. The downside: plastic degrades in UV light (plan on replacing it every 2–3 years) and ventilation is manual. On warm days, you’ll prop the top open to prevent heat buildup that can cook your plants.
For either option, placement matters. Site your cold frame or mini greenhouse where it gets 6+ hours of direct sun daily, away from tree shade. Orient it facing south (in the Northern Hemisphere) to capture maximum solar gain. When setting up a cold frame, level the ground underneath, water pooling underneath causes rot and frost heave.
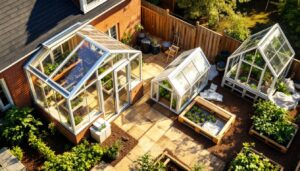
Vertical Greenhouse Designs for Compact Yards
Vertical growing flips the script on square footage. Instead of sprawling sideways, you grow up, stacking trellises, tiered shelving, and wall-mounted planters to triple or quadruple your growing capacity in the same footprint.
Lean-to designs are one of the smartest vertical moves for tight spaces. These structures literally lean against an existing wall (south-facing is ideal), so you save the material cost and footprint of a fourth side. A typical lean-to spans 6–8 feet wide and 8–10 feet deep at the base, with a sloped roof that reaches 8–12 feet at the peak. It’s part greenhouse, part art installation. You can build one with PVC frame and polycarbonate panels for $800–$1,500, or go budget-friendly with PVC and 6-mil plastic sheeting for $400–$700.
Container and Raised Bed Integration
Inside any greenhouse, whether vertical or traditional, containers and raised beds let you maximize growing layers. A tiered shelf system uses wall space to create three growing levels, turning a 4×8-foot footprint into the equivalent of a 12×8-foot flat garden. Stainless steel or aluminum shelving withstands moisture better than wood and can hold 50+ pots per tier without sagging.
Raised beds within the greenhouse, standing 12–18 inches tall, serve double duty: easier on your back and ideal for soil-heavy crops like tomatoes and peppers. Pair them with trellises for beans, cucumbers, or indeterminate tomatoes, and you’re growing upward and forward simultaneously.
When integrating containers, ensure adequate air circulation between pots. Crowding invites fungal issues and mites. Spacing pots 2–4 inches apart, using greenhouse fans on low-to-medium settings, and watering early in the day all keep humidity in the sweet spot (50–70%) rather than disease-promoting levels above 80%.
Lean-To and Wall-Mounted Greenhouse Solutions
A lean-to greenhouse is the workhorse of small spaces, it borrows your home’s thermal mass (the heat absorbed and released by masonry or siding) to keep it warmer at night. Because one side is your house wall, you reduce heat loss and frame materials. Most lean-tos are 6–12 feet wide and 4–8 feet deep, which sounds snug until you realize vertical shelving and tiered stands multiply your growing real estate.
Framing a lean-to starts with the ledger board, a 2×8 or 2×10 bolted to your home’s rim board or foundation. Building codes typically require the ledger to sit on a solid surface with flashing to prevent water intrusion. If your home has vinyl or fiber-cement siding, you’ll need to cut through to reach the rim: standard practice is removing siding, installing flashing, then re-siding after the ledger is fastened with ½-inch lag bolts spaced 16 inches on center.
Wall-mounted systems, shelving units or tiered plant stands bolted directly to fencing or walls, are lighter duty but smart for renters or temporary setups. A wall-mounted frame supporting polycarbonate panels creates a narrow growing zone perfect for propagation, microgreens, or herbs. These typically run 2 feet wide, 6–8 feet tall, and 1–2 feet deep, just enough to triple your vertical growing without dominating the yard.
For any wall-mounted project, check your local building code about setback requirements (distance from property lines). Some jurisdictions require permits for structures attached to your home: others don’t. A quick call to your building department saves headaches later. Structural connections matter too, use appropriate fasteners for your wall material (lag bolts for wood, expansion anchors for masonry) and avoid overloading beyond the manufacturer’s specifications.
Repurposed and DIY Greenhouse Projects
Some of the most resourceful small backyard greenhouse ideas come from repurposing materials. Old windows, reclaimed wood, clear acrylic sheets from demolition sites, these become the bones of budget-friendly structures that cost a fraction of commercial kits.
A window-sash cold frame uses actual salvaged window frames as glazing. Each sash becomes a transparent panel, and several can be hinged together or mounted on a simple wooden box frame. You’ll find sashes at salvage yards for $10–$40 each: a 4×6-foot cold frame made from four sashes might cost $75–$150 in materials. The trade-off: sashes are heavy, and the irregular pane sizes make weatherstripping trickier than modern greenhouse panels.
Another popular DIY project is the plastic-bottle greenhouse. It sounds kitschy, but it works: collect 2-liter bottles, fill them with water, and use them to line shelves inside a frame structure. The water absorbs daytime heat and releases it at night, acting as thermal mass. Gardeners in cool climates have extended growing seasons by 3–4 weeks using this passive heating method. It requires hundreds of bottles (and a lot of washing), but the cost is nearly zero if you’re salvaging empties.
Pallet-frame greenhouses are trending for good reason. Food-grade pallets can be sourced free or cheap, and their standardized dimensions (typically 40×48 inches) stack neatly into a frame. Line the exterior with plastic sheeting or clear tarps, add shelving inside, and you’ve got a 4×8×7-foot growing space for $200–$400 in fasteners and covering material. Ensure pallets are heat-treated (marked ‘HT’), not chemically treated (‘DB’), treated wood can leach toxins into soil.
Before starting any DIY project, plan for ventilation and structural integrity. Without adequate airflow, the interior becomes a humid petri dish for powdery mildew and fungal diseases. Install at least one door or vent panel that opens, and consider a battery-powered exhaust fan if you’re using plastic sheeting without conventional louvers.
Maximizing Year-Round Growing in Small Spaces
A greenhouse is only valuable if it extends your season and produces food. Year-round growing in a small space requires strategic planning: crop selection, temperature management, and light supplementation.
Start with cold-hardy crops for winter: kale, spinach, arugula, mâche, and Asian greens tolerate 20–40°F and actually taste sweeter after frost (sugars concentrate as the plant protects itself from cold). In many zones, these thrive in an unheated greenhouse throughout winter. Spring and early summer bring heat-lovers: tomatoes, peppers, basil, and cucumbers. Succession planting, sowing seeds every 2 weeks, keeps harvests flowing rather than coming all at once.
Temperature control is critical. A basic digital thermometer-hygrometer logs highs and lows, showing you when your greenhouse needs venting or supplemental heat. Passive solar gain often keeps a south-facing structure 10–20°F warmer than outdoors on sunny days, but cloudy spells or nighttime temps below freezing require a backup. A low-cost heater option is a propane torpedo heater (often used in garages) set to 50°F: it cycles on only when needed. Alternatively, passive thermal mass, dark water barrels, masonry blocks, or the pallet-bottle system, stores daytime heat and radiates it overnight.
In winter or shady conditions, supplemental LED grow lights bridge the gap. Modern full-spectrum LEDs consume 50–80 watts per 2×4-foot growing area and cost $100–$300 for a quality unit. Positioning lights 6–12 inches above seedlings encourages sturdy growth: a simple timer runs them 12–16 hours daily.
Water management shifts with the season. Summer means frequent watering (often daily in hot climates) but good drainage to prevent root rot. Winter watering drops dramatically, soil stays moist longer in cool conditions. Always water early in the day to let foliage dry before evening, reducing fungal issues. For creative backyard ideas, drip irrigation systems inside a greenhouse cut water waste by 30% compared to hand-watering and deliver moisture directly to roots rather than splashing on leaves.
Bioaccumulation of pests and diseases is real in a closed greenhouse. Scout weekly for spider mites, whiteflies, and powdery mildew, catching problems early means a light horticultural oil spray or neem application rather than chemical escalation. Netting over door openings prevents most flying insects from entering. Rotating crops and removing infected leaves immediately stops diseases before they spread.
Conclusion
Small backyard greenhouse ideas range from simple cold frames costing under $150 to engineered lean-to structures in the low thousands, but all deliver the same payoff: fresh produce, season extension, and the genuine satisfaction of growing your own food. Start simple, build what fits your space and budget, and refine from there. The DIYers who succeed are those who don’t skip foundation prep, ventilation planning, or pest management. Whether you’re building a vertical tower garden, repurposing salvage materials, or running a lean-to year-round, your small greenhouse becomes one of the highest-ROI projects in the backyard.